File Setup Guidelines
For laser cutting you need to create a VECTOR file as it is the only format that the laser cutter will recognise for cutting.
For engraving your artwork can be either a vector or a pixelated image, such as a JPEG.
HOW CAN I TELL IF MY FILE IS A VECTOR?
Vector files need to be DRAWN in the vector program rather than just imported or pasted in there. Also opening a vector file in a raster file program, such as Photoshop, will convert it to a raster image.
Vector File formats must be saved as PDFs
Non Vector File formats – some jpg, psd, bmp can be converted into vector files but may require fixing up.
HOW TO CREATE YOUR VECTOR FILE
The size of the laser cutter is 900mm x 600mm so your document or sheet size should be either this size or the size of the material you wish to cut.
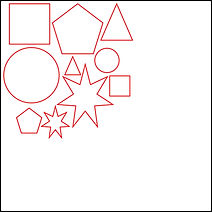
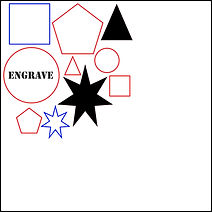
Your design should be drawn, in your vector software, using only 3 colours:
RGB (R:255, G:0, B:0) Red = cutting
RGB Black = raster engraving (Engraving works on tonal value so you can engrave a gradient)
RGB (R:0, G:0, B:255) Blue = vector etching
Any other colours will be ignored.
Here you can see some examples of different files set up and how they look cut from 3mm plywood.
-
Maximum material size: 980mm x 600mm (some materials only come in smaller sizes)
-
All files need at least 2mm minimum between objects and the edge of the material and at least 1mm between shapes.
-
All files must be nested to ensure economic use of time and materials.
-
All files must be in RGB colour profile.
CREATING VECTOR FILES IN ADOBE ILLUSTRATOR
CUT LINES (RED)
Should always be shown as 0.25pt or 0.1mm RGB red stroke.
When the laser cuts it follows the red stroke lines in your file, straight down the middle of the line.
It’s best to have all cut lines joined up so that the laser cutter follows the one single line and therefore cuts quicker.
The laser cutter will see and cut every red line in your file, if you overlap them, mask them or hide them under another object they will be found and cut.
Any double cut lines (one red line on top of another) will cut twice, causing burning, damage to your material, and more importantly damage to the laser-cutter.
VECTOR ETCH (BLUE)
Should always be shown as 0.25pt or 0.1mm RGB blue stroke.
Vector etching is used for etching line work onto the surface of the material. It is the same as the red cutting except at a higher speed with less power so the laser only cuts the top layer of the material.
Usually it is a much quicker method to etch simple line art, however it can take longer when there are lots and lots of lines (like small text).
RASTER ENGRAVING (BLACK/TONAL VALUE)
Can be drawn as any combination of vector lines, strokes and shapes or a raster image.
Raster etching is created by the laser head going back and forth across the sheet like an inkjet printer would. Think about where you place your images for engraving, it is best if you keep your files with multiple images in the same area on the sheet and in horizontal rows where possible, this will etch quicker.
Please contact us if you require help creating a file for laser cutting and/or engraving. If you require us to draw the files for you it will incur a fee depending on size/complexity of the artwork.

NESTED

NOT NESTED

THREE TYPES IN ONE FILE
